In this lab you will gain experience using the annotation
support from Spring to configure the rewards application. You will
use an existing setup and transform that to use annotations such as
@Autowired, @Repository and @Service to configure the components of the
application. You will then run a top-down system test that uses
JUnit 5.
What you will learn:
@AutowiredSpecific subjects you will gain experience with:
Estimated time to complete: 45 minutes
Quick instructions for this exercise have been embedded within the lab materials in the form of TODO comments.
To get the most from this lab, please follow the TODO steps in the order they appear. Please do not jump ahead to later TODOs in the same file or some features of the lab won’t work as described.
![[Tip]](images/tip.png) |
Tip |
|---|---|
|
To display the TODO steps, open the Occasionally, TODO’S defined within XML files disappear
from the |
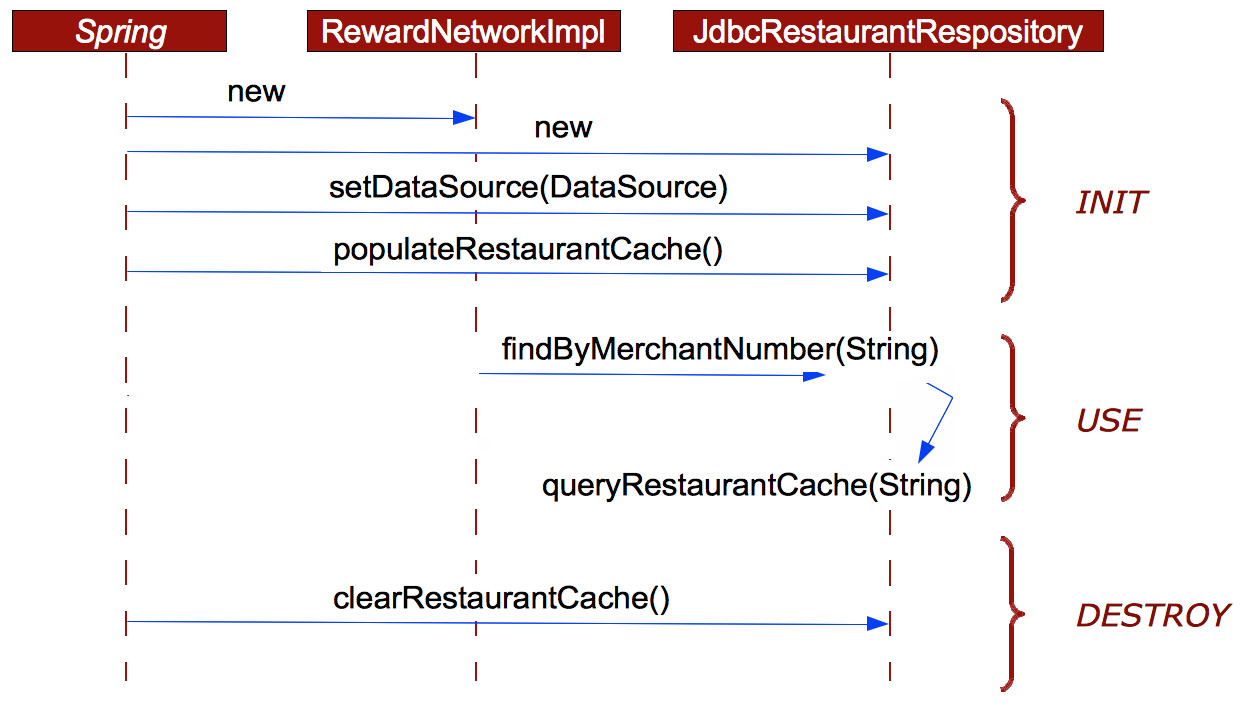
The following sequence diagram will help you to perform the TODOs for implementing the bean life cycle behaviors.
In this lab, we are using a version of the rewards application that is already fully
functional. Essentially, it is the completed version of the last
exercise. It has repository implementations that are backed by JDBC
and which connect to an in-memory embedded HSQLDB database. We will
then rewrite some of the application code to make use of
annotations.
(TODO-01) The project features an integration test that verifies
the system’s behavior. It’s called RewardNetworkTests and lives in the rewards package. Run this test by
right-clicking on it and selecting 'Run As…' followed
by 'JUnit Test'. The test should run successfully.
Now open the application configuration called RewardsConfig.java (use CTRL+SHIFT+T [Windows/Linux] or COMMAND+SHIFT+T [Mac] to popup the "Open
Type" search dialog and quickly navigate to it). Review the @Beans
that wires up all the dependencies. As you can see, we’re
using constructor arguments.
Remember that the infrastructure components (the DataSource for
example) are located in a separate application configuration class.
If you navigate back to the test you will see that the setUp() method specifies the TestInfrastructureConfig.java infrastructure
configuration file.
(TODO 02) So you’ve fully reviewed the entire application
and you’ve seen nothing out of the ordinary. We’re now
going to refactor the application to use annotation based
configuration. In RewardsConfig.java,
remove the @Bean methods for all beans. Also remove the @Autowired
DataSource. In other, the class should contain no methods and no
variables.
Try re-running the test. It should fail now. Spring has no idea
how to inject the dependencies anymore, since you have removed the
configuration directive. Next, we’ll start adding
configuration metadata using stereotype annotations and the @Autowired annotation.
(TODO 03) Open the RewardNetworkImpl class and annotate it with
one of the available stereotypes. It is definitely not a repository
or controller, so we should use @Component or @Service (@Service is
probably more descriptive here). Also annotate the constructor with
@Autowired OR you can annotate the individual private fields with
@Autowired (annotating the constructor is less typing).
(TODO 04) Now open JdbcRewardRepository and annotate it with a
stereotype annotation. Since it is a repository class, the
@Repository annotation is the obvious choice here. Mark the setDataSource() method with that same
@Autowired annotation. This will tell Spring to inject the setter
with a instance of a bean matching the DataSource type. You could use field-level
injection instead if you prefer, the application will work the same
either way.
(TODO 05) Open the JdbcAccountRepository class, annotate it as
a @Repository, and annotate the setDataSource() method with @Autowired.
(TODO 06) Annotate the JdbcRestaurantRepository class with
@Repository. But this time we will use the @Autowired annotation on the constructor
instead of a setter. If you take a look at the constructor you will
see why, it calls a populateRestaurantCache method, and this method
requires a reference to the DataSource in order to access the
DB.
(TODO 07) Although our classes are now properly annotated, we
still have to tell Spring to search through our Java classes to
find the annotated classes and carry out the configuration. To do
this, open RewardsConfig.java and add
the @ComponentScan("rewards")
annotation. This annotation turns on a feature called component
scanning which looks for all classes annotated with annotations
such as @Component, @Repository or @Service and creates Spring beans from those
classes. It also enables detection of the dependency injection
annotations. The "rewards" argument is the base package that we
want Spring to look from, this will keep Spring from unnecessarily
scanning all org.* and com.* packages on the classpath.
Once you’ve added this, save all your changes and re-run the test and see that it passes.
If you recall the design described in Reward Dining:
The Course Reference Domain, restaurant data is read often but
rarely changes. You can browse JdbcRestaurantRepository and see that it has
been implemented using a simple cache. Restaurant objects are cached to improve
performance (see methods populateRestaurantCache and clearRestaurantCache for more details).
The cache works as follows:
JdbcRestaurantRepository is
initialized it eagerly populates its cache by loading all
restaurants from its DataSource.For convenience, the full sequence is shown again below.
Open JdbcRestaurantRepository in
the rewards.internal.restaurant
package. Notice that we are using the constructor to inject the
dependency. You can run the test RewardNetworkTests and see that it works
well as it is now.
However, what if you had decided to use setter injection instead of constructor injection? It is interesting to
understand what happens then.
(TODO 08) Change the dependency injection style from constructor
injection to setter injection: Move the @Autowired from the constructor to the setDataSource method. Now, execute RewardNetworkTests to verify. It should fail
and you should see a NullPointerException. Why did the test fail?
Investigate the stack-trace to see if you can determine the root
cause.
Inside JdbcRestaurantRepository,
the default constructor is now used by Spring instead of the
alternate constructor. This means the populateRestaurantCache() is never called.
Moving this method to the default constructor will not address the
issue as it requires the datasource to be set first. Instead, we
need to cause populateRestaurantCache() to be executed
after all initialization is complete.
(TODO 09) Scroll to the populateRestaurantCache method and add a
@PostConstruct annotation to cause
Spring to call this method during the initialization phase of the
lifecyle. You can also remove the populateRestaurantCache() call from the
constructor if you like. Re-run the test now and it should
pass.
A valid argument can be made that populateRestaurantCache should never have
been in the constructor, and using @PostConstruct is a better approach.
Your test seems to run fine, let us now have a closer look.
(TODO-10) Open JdbcRestaurantRepository and add a simple
print statement in clearRestaurantCache so we can see when it
is being run:
System.out.println("clearRestaurantCache invoked");
(TODO-11) Re-run RewardNetworkTests
- check the console output. Note that your clearRestaurantCache invoked message was not
generated so clearRestaurantCache is
not called, which means that your cache is never cleared.
Add an annotation to mark this method to be called on shutdown.
Save your work and run RewardNetworkTests one more time. You should
now see clearRestaurantCache invoked
output to the console.
|
Tip |
|---|---|
|
Later in this course, you will learn that there is a more
elegant way to work with JUnit. By using Spring’s Testing
support an |
When this is done, you’ve completed this section! Your repository is being successfully integrated into your application, and Spring is correctly issuing the lifecycle callbacks to populate and clear your cache. Good job!