In this lab you will gain experience with aspect oriented programming (AOP) using the Spring AOP framework. You’ll add cross-cutting behavior to the rewards application and visualize it.
What you will learn:
Specific subjects you will gain experience with:
Estimated time to complete: 35 minutes
Important Note 1: The JUnit tests you will run in this lab already work. Just getting a green test does not indicate success. You must also get logging messages in the console.
Important Note 2: Students often find this one of the hardest labs. If you get totally stuck please ask a colleague or your instructor - don’t waste the whole lab trying to fix your first pointcut expression.
Quick instructions for this exercise have been embedded within
the lab materials in the form of TODO comments. To display them,
open the Tasks view (Window >> Show view >>
Tasks (not Task
List)).
Up until now you have used Spring to configure and test your main-line application logic. Real-world enterprise applications also demand supporting services that cut across your main-line logic. An example would be logging: there may be many places in your application where you need to log data for monitoring. Historically, this may have lead to copying-and-pasting code, or entangling your application code with infrastructure. Today, you turn to aspect oriented programming (AOP). In the following steps you will create an aspect to monitor your application’s data access performance.
The tests we use in this lab already run successfully. Adding an aspect to a class does not necessarily change what that class does, often it just extends its functionality. In this lab we will add extra logging, so not only must tests pass, there should be the expected logging on the console.
Capturing output to the console means diverting System.out and System.err and saving all output to an
internal buffer. Fortunately Spring Boot provides a convenient
class to do this, OutputCapture, which
can be used independently of the rest of Spring Boot. All the tests
already have output-capture enabled, but currently output testing
is turned off (until you write some aspects, there is no logging to
check).
(TODO-01) Open TestConstants and
change the CHECK_CONSOLE_OUTPUT boolean to true.
REQUIREMENT #1: Create a simple logging aspect for repository find methods.
In this section, you will first define the logging behavior,
then the rules about where the behavior should be applied.
You’ll use the annotated @Aspect
definition style.
(TODO-02) The definition of the aspect has already been started
for you. Find it in the rewards.internal.aspects package.
Open the LoggingAspect.java file
and you’ll see several TODOs for you to complete. First,
complete the step by annotating the LoggingAspect class with the @Aspect annotation. That will indicate this
class is an aspect that contains cross-cutting behavior called
"advice" that should be woven into your application.
The @Aspect annotation marks the class as an aspect, but it is still not a Spring bean. Component scanning can be very effective for aspects, so mark this class with the @Component annotation. This object requires constructor injection, so mark the constructor with an @Autowired annotation. We will see where this dependency comes from and turn on the actual component scanning in a later step.
(TODO-03) We aren’t interested in logging every method of your application,
though, only a subset. At this stage, you’re only interested
in logging the find* methods in your
repositories, the objects
responsible for data access in the application.
Try to define a pointcut expression that matches all the find* methods, such as`
findByCreditCard(), in the
`AccountRepository, RestaurantRepository, or RewardRepository interfaces.
![[Tip]](images/tip.png) |
Tip |
|---|---|
|
If you get stuck - refer to the pointcut examples in the slides.
Or try writing a pointcut expression that just matches |
You will need a @Before advice on
the implLogging() method which has
already been implemented for you. It takes a JoinPoint object as a parameter, and logs
information about the target objects invoked during the application
execution.
(TODO-04) Now that your aspect has been defined, you will create the Spring configuration needed to weave it into your application.
Inside config/AspectsConfig.java,
add an annotation to scan for components ONLY in the rewards.internal.aspects package. This will
cause your LoggingAspect to be
detected and deployed as a Spring bean.
Next, add the @EnableAspectJAutoProxy tag to this file.
This instructs Spring to process beans that have the @Aspect annotation by weaving them into the
application using the proxy pattern. This weaving behavior is shown
graphically below:
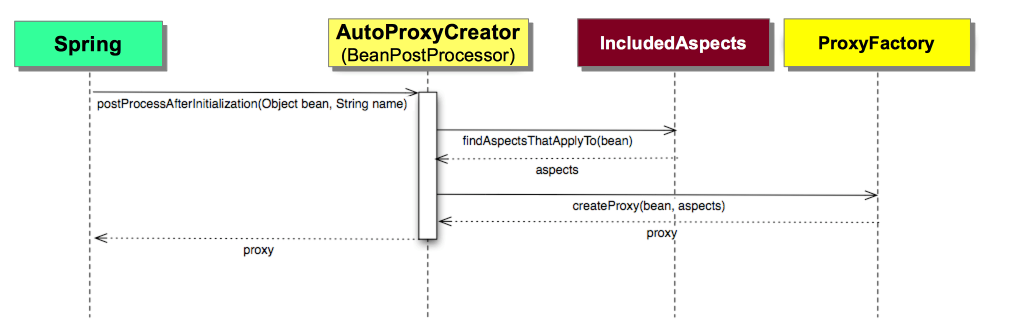 |
Figure 8.1. Spring’s auto proxy creator weaving an aspect into the application using the proxy pattern
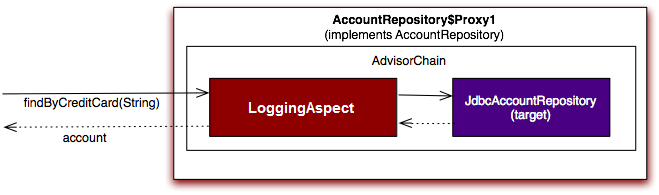
This next figure shows the internal structure of a created proxy and what happens when it is invoked:
When you have your aspect defined as a Spring bean along with the autoproxy annotation, move on to the next step!
To see this aspect in action, plug it into the
application’s system test configuration. To do that, simply
adjust the @Import to include AspectsConfig.class in the SystemTestConfig.java configuration class
(TODO-05).
After the configuration file has been added, (TODO-06) run LoggingAspectTest in STS and watch the
console. You should see:
INFO : rewards.internal.aspects.LoggingAspect -
'Before' Advice implementation - class rewards.internal.account.JdbcAccountRepository;
Executing before findByCreditCard() method
|
Tip |
|---|---|
|
If you don’t see any console output your pointcut expression is most probably wrong. Refer back to the notes for TODO-03 and see if you can fix it. Please ask a colleague or your instructor if you really can’t work out the problem. Don’t waste the entire lab trying to fix your first pointcut expression. |
When you see the logging output, your aspect is being applied.
If you wrote a very general pointcut expression earlier, as
suggested by these notes (just find*
methods), try to make it more specific to match find* methods on *Repository classes.
Once everything is working, move on to the next step!
REQUIREMENT #2: Implement
a Around Advice which logs the time
spent in each of your update
repository methods.
LoggingAspect class,
and examine the monitor(ProceedingJoinPoint) method. Most of
the method has been implemented for you. You will complete it
now.(TODO-07) Specify @Around advice
for the monitor method. Define a
pointcut expression that matches all the update* methods (such as JdbcAccountRepository.updateBeneficiaries(…)
on the AccountRepository, RestaurantRepository, or RewardRepository interfaces.
Again there is a HINT in the TODO Text if you are stuck.
(TODO-08) Now in monitor(ProceedingJoinPoint) method, notice
the Monitor start and stop logic has already been written for you.
What has not been written is the logic to proceed with the target
method invocation after the watch is started. Complete this step by
adding the proceed call.
|
Tip |
|---|---|
|
Remember, the call to |
(TODO-09) Once you’ve added the proceed call, modify the
expectedMatches in RewardNetworkTests class because now there
should be 4 lines of logging output not 2. If the test passes and
you can see relevant logging information in the console, your
monitoring behavior has been implemented correctly.
Again, please ask a colleague or your instructor if you can’t get the test to pass.
Create an exception handling aspect as follows:
DBExceptionHandlingAspect class by
annotating the method implExceptionHandling(Exception e) to be
used in the event of an exception. Which type of advice will you
need?(TODO-12) After the configuration has been added, run DBExceptionHandlingAspectTests in Eclipse
and watch the console. If you can see relevant logging information
in the console, your exception handling behavior has been
implemented correctly.
Congratulations, you’ve completed the lab!