In this lab you will simplify your existing JPA code using Spring Data’s automatic repositories.
What you will learn:
application.properties to set up database
propertiesEstimated time to complete: 30 minutes
Quick instructions for this exercise have been embedded within
the lab materials in the form of TODO comments. To display them,
open the Tasks view (Window >> Show View >>
Tasks (not Task
List)).
This lab consists of two parts:
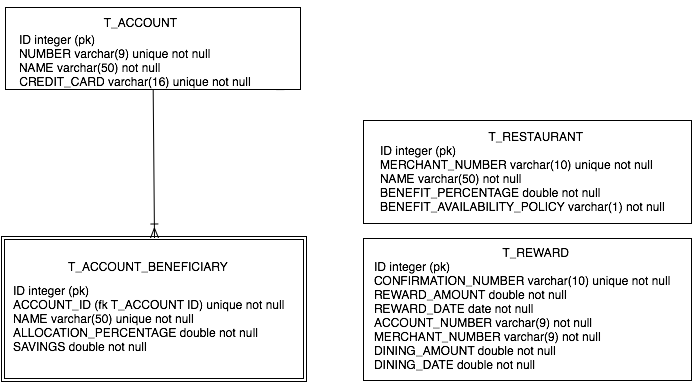
Refer to the schema diagram for help with table and column names:
By extending an Spring Data repository interface, we are letting Spring Data JPA automatically implement most of our repository code for us.
(TODO-01) Open AccountRepository.
As you can see, this is an ordinary Java interface (POJI).
Alter this interface to extend the Spring Data JPA Repository interface. This interface is
known to the Spring Data JPA framework, and it can use it to
automatically implement a number of useful methods for us.
Repository is a typed interface,
so we need to describe the data types that the implementation class
is intended to work on. The first type is the entity class that
this repository is intended to operate on: Account. The second is the type of the ID
column that we setup on the Account. If you re-open the Account
class you will see that the data type of the @Id field is a basic java.lang.Long, so simply indicate Long as the second type.Next, we need a method to look up an Account using a credit card
number. The Spring Data JPA framework follows a simple convention
that we can employ to have it automatically implement this logic:
the method syntax is findBy<DataMember><Op>, where
“Op” can be Gt, Lt, Ne, Between, Like… For the equals case,
“Op” can be omitted, so the resulting method name would
be findByCreditCardNumber taking a
String parameter and returning an
Account. Refactor to change the
name.
That’s all the code we need to write! Spring Data JPA will automatically implement all the methods defined in the Repository interface, plus the method we defined using a naming convention.
![[Note]](images/note.png) |
Note |
|---|---|
|
Because we have written zero lines of executable Java code, we can bypass the traditional unit test and go straight to integration / system testing, which we will do in a later step. Of course there are many more things that Spring Data can do (we can even combine Spring Data JPA automatic repositories with our own). |
(TODO-02) Since Spring Data will generate implemention code, we don’t need JpaAccountRepository class anymore - delete the class completely.
(TODO-03) Open RestaurantRepository.
Repository interface. Repository is a typed interface, Repository<T, K>, where T is the data type that the repository
implementation class is intended to work on and K is the type of the restaurant’s id
field.Next, we need a method to look up Restaurant using a merchant
number. Following the Spring Data method naming convention, and
observing that Restaurant stores the
merchant number in a data member called number.
The method should take a String parameter and return a Restaurant. The existing method has the
right signature but the wrong name. Refactor to change the the
name.
(TODO-04) Since Spring Data will generate implemention code, we don’t need JpaRestaurantRepository class anymore - delete the class completely.
The interfaces we have just modified do nothing by themselves. In a traditional application we would have to write a Java class that implements them, then write the JPA code for the queries.
With Spring Data JPA the implementations will be created automatically at runtime, but need to "activate" the framework to make Spring Data do so.
(TODO-05) Open the configuration class RewardsConfig and add the @EnableJpaRepositories annotation to the
class. Within this annotation, you should specify the base package
under which all of the Repository
classes can be found.
Open RewardNetworkImpl (TODO-06).
Since the methods we have changed in the AccountRepository and RestaurantRepository interfaces are
different from the methods we have used in the previous lab, check
that rewardAccountFor is using the new
method names. If you refactored correctly this should be the case.
Otherwise, fix the method names now.
(TODO-07) Now we should be able to run the test and the test should succeed.
Spring Boot greatly simplifies configuration of an application
through the use of properties. By convention these properties are
put in the application.properties
file.
|
Note |
|---|---|
|
Any properties file could be used, but Spring Boot will find and
load |
Pretty much everything including database settings can be configured by simply specifying the right property values.
The properties you need for this lab can be found by referring to the Student handout
The next three steps involve setting up Spring Boot configuration properties:
application.properties
(TODO-08) - it is in src/main/resources. Define properties to
make Spring Boot run the same database scripts that SystemTestConfig currently runs.The remaining steps involve simplifying SystemTestConfig.
SystemTestConfig class
(TODO-11) and add an annotation that tells JPA where to find your
entities (the classes annotated with JPA’s @Entity).SystemTestConfig used to perform by
giving Spring Boot just enough configuration properties to do it
all instead. You can remove or delete all the bean
configurations(TODO-12).If you have a successfully running test, congratulations!
![[Important]](images/important.png) |
Important |
|---|---|
|
How did this work?
|
What You Have Achieved. You have simplified your application using Spring Data JPA Repositories and Spring Boot auto-configuration.