In this lab you will gain experience with Spring’s JMS
support. You will complete an implementation of a DiningBatchProcessor that sends dining event
notifications to the reward network as messages. You will also
configure a logger to receive the reward confirmations
asynchronously.
What you will learn:
Specific subjects you will gain experience with:
Estimated time to complete: 45 minutes
![[Note]](images/note.png) |
Note |
|---|---|
|
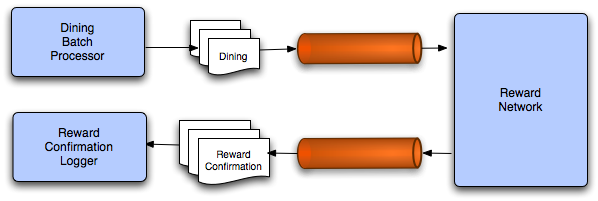
Refer to the diagram as you proceed through the lab - we get you to implement the code in the same order as the flow. |
You will have to implement every step before you can run anything. Only at the end will you know if it all works.
Quick instructions for this exercise have been embedded within
the lab materials in the form of TODO comments. To display them,
open the Tasks view (Window >> Show View >>
Tasks (not Task
List)).
The instructions for this lab are organized into five sections. In the first section, you will establish the messaging infrastructure. In the second section, you will learn how to send dining notifications as messages. In the third and fourth sections, you will define and configure listeners to enable message reception by Message-Driven POJOs. In the final section, you will complete a test case to verify that the batch of dining notifications is successfully producing the corresponding confirmation messages.
In this section you will configure the necessary infrastructure to support the Reward Network in a messaging environment.
(TODO-01) In JMS-based applications, the Connection is obtained
from a ConnectionFactory.
Spring’s JMS support will handle the resources, but it does
require a ConnectionFactory bean
definition. In this step you will review what we have setup for
you.
Open the JmsInfrastructureConfig
class in the config package. There is
a bean definition to create an instance of org.apache.activemq.ActiveMQConnectionFactory.
Note the brokerURL property.
![[Tip]](images/tip.png) |
Tip |
|---|---|
|
For this simple lab, you will be using an embedded broker with
persistent queues disabled. Also Spring will handle shutdown of the
Broker, so ActiveMQ doesn’t have to. Hence the |
Once you’re happy you understand this bean definition, move on to the next step!
(TODO-02) Now you will need to create two queues, one for
handling dining notifications and the other for handling the reward
confirmations. Create two bean definitions of type org.apache.activemq.command.ActiveMQQueue
and call them "diningQueue" and "confirmationQueue". Provide a
unique name for each queue using constructor injection. You can use
any names you want (we suggest “rewards.queue.dining”
and “rewards.queue.confirmation”, which are the names
used in the solution, or something similar if you prefer), but keep
track of the names for use in a later step.
![[Warning]](images/warning.png) |
Warning |
|---|---|
|
Remember the queue names you select, you will need them later. If you specify the wrong queue name later, the messages are quietly ignored. You DO NOT get an error. Using the wrong queue-names is the most common error in this lab. |
You are now ready to move on to the next section.
In the previous section you configured a queue for dining notifications. In this section you will provide the necessary code to send dining notifications to that queue from a batch processor.
(TODO-03) Navigate to the JmsDiningBatchProcessor within the rewards/jms/client package. This class will
be responsible for sending the dining notifications via JMS.
Provide a field for an instance of Spring’s JmsTemplate so that you will be able to use
its convenience method to send messages. Add a setter or
constructor to allow you to set this dependency later via
dependency injection.
(TODO-04) Now complete the implementation of the
processBatch(..) method by calling the one-line convenience method
provided by the JmsTemplate for each
Dining in the collection.
|
Note |
|---|---|
|
Here you can rely on the template’s default message
conversion strategy. The |
(TODO-05) Open the ClientConfig
class within the config package.
Define a bean definition for the JmsTemplate. Keep in mind that it will need
a reference to the ConnectionFactory
as well as its destination.
Once you have defined the bean, inject it into the JmsDiningBatchProcessor that is already
defined in that same file. Then move on to the next section.
In the previous section you implemented the dining notification
sending. In this section you will provide the necessary
configuration for receiving those messages and delegating their
content to the RewardNetwork. You will
do this using an annotation-driven approach.
(TODO-06) Open the RewardNetworkImpl class within the rewards.internal package. Locate the rewardAccountFor method, this is the method
that we want to use to process the JMS message and create and
return a JMS response message. But to keep our code completely
decoupled from the JMS API, we will use Spring annotations to
simply indicate the incoming and outgoing JMS destinations.
Place the @JmsListener annotation
above the rewardAccountFor method.
Within this annotation, set the name of the destination that you
created earlier, the one that will contain the Dining objects.
(Recall that in JMS, the term destination refers to both where
messages come from as well as where they go to.) Be sure to use the
actual destination / queue name and NOT the bean ID. There are many
other setting that you can control on this annotation, but the
destination is the only one we need to set now.
Note that this method returns a RewardConfirmation object used to record
information about the reward. We would like to take this returned
object and send it back out to a separate JMS destination. Use the
@SendTo annotation to define the
destination to send this confirmation to. As before, be sure to use
the actual destination / queue name, not the bean ID.
At this point, the rewardAccountFor
method is "wired" to receive JMS traffic as Dining objects and
return RewardConfirmation objects. But we still have to setup a few
more pieces before our system will work. Move on to the next
step.
In the previous section, you configured the reward network to receive messages and also to reply automatically to a queue with reward confirmations. Now you will define another Message-Driven POJO so that those confirmations will be received and logged.
(TODO-07) Open RewardConfirmationLogger in the rewards.jms.client package. This existing
logic is designed to simply listen for RewardConfirmation objects
on the confirmations queue and keep track of how many we receive.
However, it is not yet "wired" into the JMS infrastructure to do
this work.
Place the @JmsListener annotation
above the log method. Within this
annotation, set the name of the destination that you created
earlier, the one that will contain the RewardConfirmation objects.
Be sure to use the actual destination / queue name and NOT the bean
ID. Note that this method does not return any return value, so you
do not need to supply a @SendTo.
In the previous sections, you configured two method to respond
to JMS input. However there are still some housekeeping items that
we need to setup to hook all the pieces together - we have to tell
Spring to look for and process the @JmsListener annotations, and we need to
setup a factory that can produce the listener containers needed to
wrap the JMS processing endpoints.
(TODO-08) Return to the JmsInfrastructureConfig class and add a
@Bean definition. The bean we want to create should have the ID of
jmsListenerContainerFactory, and
should instantiate and return a DefaultJmsListenerContainerFactory object.
This Factory is used by Spring whenever it needs to create a
"Listener Container" for one of our @JmsListener-annotated methods. We could
provide separate beans for each @JmsListener-annotated method, but they
would typically be configured exactly the same, so providing Spring
a factory to use is much less work.
The DefaultJmsListenerContainerFactory has many
properties that we can set, but for our exercise we really only
need to provide a reference to the connection factory. You defined
this bean in one of the first steps, so simply set this dependency
before returning.
(TODO-09) Finally, we need to tell Spring to look for the @JmsListener and @SendTo annotations we’ve placed in
the code, and to wrap these in proxies associated with the relevant
JMS Listener Containers. Simply add a @EnableJms annotation on the top of any
@Configuration class to turn this
feature on.
At this point the messaging configuration should be fully established. It is now time to verify that configuration. Luckily a test case is already provided with all but two remaining tasks to complete.
(TODO-10) Navigate to the DiningBatchProcessorTests in the rewards/jms/client package in the src/test/java folder. Notice that the class
makes use of Spring’s support for integration testing and
that the diningBatchProcessor and
confirmationLogger fields will be
automatically injected using the @Autowired annotation..
In the testBatch() method, a number of Dining objects are being instantiated and
added to a List. Here you simply need
to invoke the method that you implemented previously in the JmsDiningBatchProcessor class.
(TODO-11) Finally, provide an assertion to verify that the
entire batch was sent and that the confirmationLogger has received the same
number of replies. Run this test, it should pass at this point. If
you receive a failure, examine the exception message carefully,
backtracking your steps as needed to produce a successful run.
|
Tip |
|---|---|
|
If you are having trouble and not receiving any useful error
messages, check your queue names carefully - ActiveMQ quietly drops
messages sent to a queue it doesn’t recognize. Next lower the
log level for |
Once your tests pass, you have completed this lab. Congratulations!