In this lab you will gain experience using Spring to configure the completed Reward Dining: The Course Reference Domain. You’ll use Spring to configure the pieces of the application, then run a top-down system test to verify application behavior.
What you will learn:
Specific subjects you will gain experience with:
Estimated time to complete: 45 minutes
If you feel you have a good understanding of the material, follow the steps listed here. However, if you would like more detailed guidance, the next section contains more detailed step-by-step instructions.
If you aren’t sure, try the quick instructions first and refer to the detailed instructions if you need more help. Each quick-instruction has a link to the corresponding detailed instructions.
![[Note]](images/note.png) |
Note |
|---|---|
|
There are TODO tasks in this lab so make sure you have opened the Tasks view in STS (this was covered in the previous Lab). . |
Creating application configuration file (details)
(TODO-01 - TODO-04) Go to the config package and open the file RewardsConfig. Note that the class does not
need to extend any other classes or implement any interfaces.
Annotate the RewardsConfig class to
mark it as a special class for providing configuration
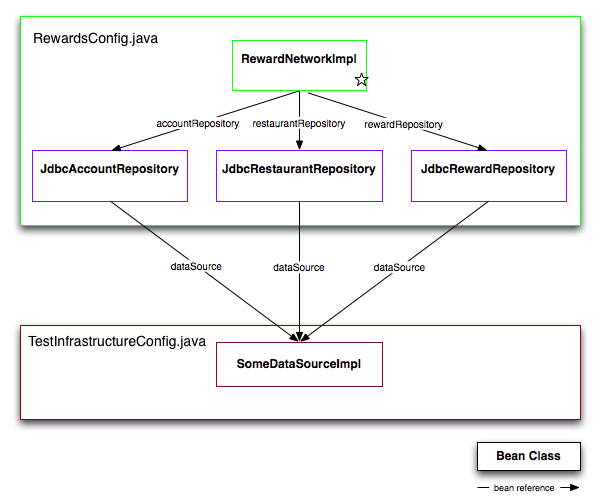
instructions. Within this class, define your four @Bean methods as shown below, in the RewardsConfig.java box. Each method should
contain the code needed to instantiate the object and set its
dependencies. Since each repository has a DataSource property to
set, and since the DataSource will be
defined elsewhere (TestInfrastructureConfig.java), you will
need to define a DataSource field /
instance variable set by Spring using the @Autowired annotation. For consistency with
the rest of the lab, give your RewardNetworkImpl @Bean method the name rewardNetwork.
(TODO-05) Go to src/test/java and
open RewardsConfigTests. Uncomment the
code as instructed. If it doesn’t compile - fix RewardsConfig. Run the test and make sure it
passes before moving on.
Infrastructure configuration (details)
(TODO-06) Next review the infrastructure configuration necessary
to test your application. We need a datasource for your application
to use to acquire database connections in a test environment. Open
TestInfrastructureConfig.java file and
verify the datasource and database connection code - there is no
need to modify the @Bean method.
(TODO-07) This TestInfrastructureConfig.java will also
serve as the master configuration class for our upcoming test. To
have it serve in this role, add an @Import to the class to reference your new
RewardsConfig.class.
Create the system test class (details)
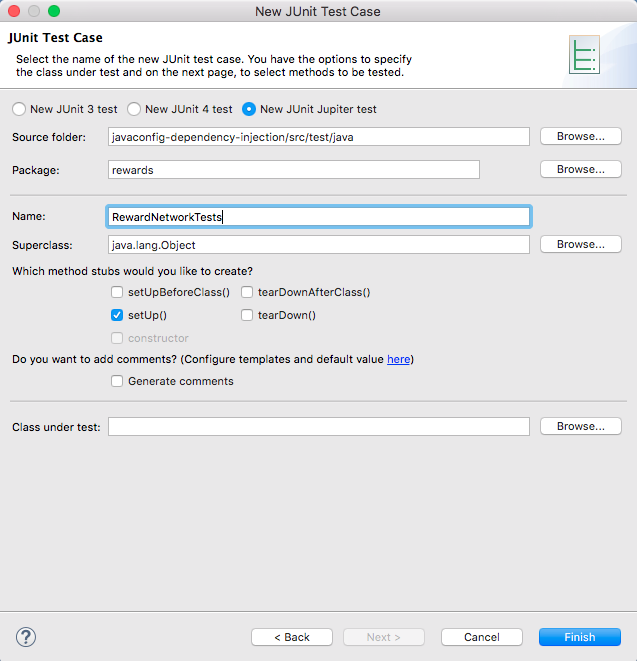
(TODO-08) Create a new JUnit Jupiter (JUnit 5) test called RewardNetworkTests in the rewards package inside the src/test/java source folder. Other than
using @BeforeEach instead of @Before, it will be just like a JUnit 4
test.
Implement test setup logic (details)
(TODO-09) Add the @BeforeEach test
setup logic required to run your system test. In this method, you
will need to create an application context using the master
configuration class from the last step (TestInfrastructureConfig.java). In addition,
you need to obtain a reference to the the rewardNetwork bean from the
application context. Assign this as a private field that you can
reference in your test methods.
Implement test logic (details)
(TODO-10) Copy the unit test (the @Test method) from RewardNetworkImplTests.testRewardForDining()
- we are testing the same code, but using a different setup.
Run the test
(TODO-11) With the test setup logic implemented, you’re
ready to test your application. Run your new unit test. It will
invoke RewardNetwork.rewardAccountFor(Dining)
method to verify all pieces of your application work together to
carry out a successful reward operation. You should get a green bar
in the JUnit view.
Congratulations the lab is finished.
In the previous exercise you’ve coded your RewardNetworkImpl, the central piece of this
reward application. You’ve unit tested it and verified it
works in isolation with dummy (stub) repositories. Now it is time
to tie all the real pieces
of the application together, integrating your code with supporting
services that have been provided for you. In the following steps
you’ll use Spring to configure the complete rewards
application from its parts. This includes plugging in repository
implementations that use a JDBC data source to access a relational
database.
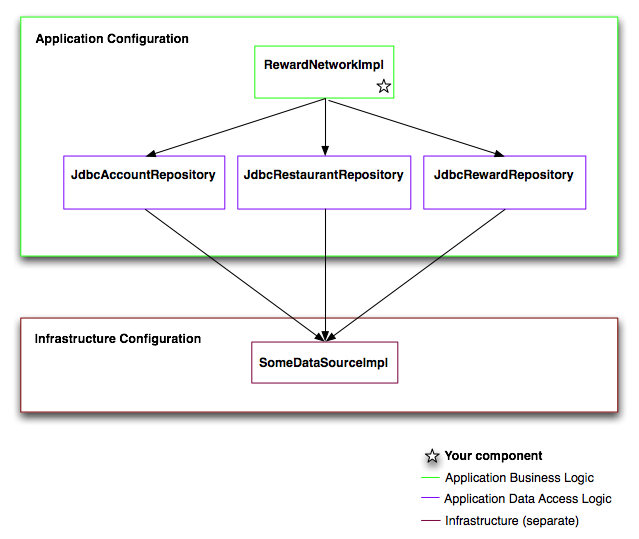
Below is a configuration diagram showing the parts of the rewards application you will configure and how they should be wired together:
The system diagram shows the configuration split into two categories: Application Configuration and Infrastructure Configuration. The components in the Application Configuration box are written by you and makeup the application logic. The components in the Infrastructure Configuration box are not written by you and are lower-level services used by the application. In the next few steps you’ll focus on the application configuration piece. You’ll define the infrastructure piece later.
In your project, you’ll find your familiar RewardNetworkImpl in the rewards.internal package. You’ll find
each of the JDBC-based repository implementations it needs, located
with their domain objects, inside the rewards.internal package. Each repository
uses the JDBC API to execute SQL statements against a DataSource
that is part of the application infrastructure. The DataSource
implementation you will use is not important for this exercise but
will become important later.
Spring configuration information can be externalized from the main Java code, partitioned across one or more Java configuration files. In this step you’ll create a single configuration file that tells Spring how to configure your application components.
Under the src/main/java folder,
find the config package and open the
class RewardsConfig. Note that the
class does not need to extend any other classes or implement any
interfaces.
We will however add some code and Spring annotations to it to
create the result illustrated in the RewardsConfig box below:
First, place a @Configuration
annotation on the RewardsConfig class.
This tells Spring to treat this class as a set of configuration
instructions to be used when the application is starting up.
![[Tip]](images/tip.png) |
Tip |
|---|---|
|
When typing in any classname in STS, use |
Next, within this RewardsConfig.java class, define four
methods annotated with the @Bean
annotation. Each method should instantiate and return one of the
beans in the illustration, accountRepository, restaurantRepository, rewardRepository, and rewardNetwork. For example, you should
create an accountRepository() method
that instantiates JdbcAccountRepository and returns it.
Looking back at the illustration, you can see that each of the
three repositories has a dependency on a DataSource that will be defined elsewhere.
This means in each repository method we must make a call to the
repository’s setDataSource(),
passing in a reference to the dataSource. But where will we get the DataSource from when it is defined in
another file (in our case in TestInfrastructureConfig.java)?
The class already has a DataSource
defined for you, but we need to give it a value. To make the class
easy to test, define a constructor that accepts a DataSource and sets dataSource.
|
Note |
|---|---|
|
As this is the only constructor on the class |
Finally, you should be aware that Spring will assign each bean
an ID based on the @Bean method name.
The instructions below will assume that the ID for the RewardNetwork bean is rewardNetwork. Therefore, for consistency
with the rest of the lab, give your RewardNetworkImpl @Bean method the name rewardNetwork.
|
Tip |
|---|---|
|
As you define each bean, follow bean naming conventions. The arrows in the configuration diagram representing bean references follow the recommended naming convention. |
For best practices, a bean’s name should describe the
service it provides. It
should not describe implementation details. For this reason, a
bean’s name often corresponds to its interface. For example, the class
JdbcAccountRepository implements the
AccountRepository interface. This
interface is what callers work with. By convention, then, the bean
name should be accountRepository.
Similarly each bean method should return an interface not a
concrete class. So the accountRepository() method should return
AccountRepository not JdbcAccountRepository.
|
Tip |
|---|---|
|
As you define each bean, have Eclipse auto-suggest for you.
Press |
As RewardsConfig is a Java class we
can unit test it. Once you have the four beans defined and
referenced as shown in the configuration
diagram, open RewardsConfigTests -
in the config package under src/test/java.
Note that a mock dataSource has
been defined already.
Uncomment the code between /* and
*/. This should compile if you
implemented RewardsConfig correctly.
If not, fix RewardsConfig as
necessary. Make sure your @Bean
methods have the right names, return the right implementations and
that their signatures define interfaces as return types.
Run the test (in STS, right click anywhere in the code window,
select Run As … then
JUnit Test).
Once the test passes, move on to the next step!
In the previous step you visualized bean definitions for your application components. In this step we’ll investigate the infrastructure configuration necessary to test your application.
To test your application, each JDBC-based repository needs a
DataSource to work. For example, the JdbcRestaurantRepository needs a DataSource
to load Restaurant objects by their
merchant numbers from rows in the T_RESTAURANT table. So far, though, you have
not defined any DataSource implementation. In this step
you’ll see how to setup a DataSource in a separate
configuration file in your test tree. It’s in the test area,
because it is only for testing - it is not the one you would use in
production.
In the src/test/java source folder,
navigate to the root rewards package.
There you will find a file named TestInfrastructureConfig.java. Open it.
You will see that a DataSource is
already configured for you. You don’t need to make any
changes to this bean, but you do need to understand what we have
defined here for you. This TestInfrastructureConfig.java will also
serve as the master configuration class for our upcoming test. To
have it serve in this role, add an @Import to the class to reference the RewardsConfig.class.
|
Note |
|---|---|
|
To import |
Spring ships with decent support for creating a DataSource based on in-memory databases such as H2, HSQLDB and Derby. The code you see is a quick way to create such a database.
Notice how the Builder references external files that contain
SQL statements. These SQL scripts will be executed when the
application starts. Both scripts are on the classpath, so you can
use Spring’s resource loading mechanism and prefix both of
the paths with classpath:. Note that
the scripts will be run in the order specified (top to bottom) so
the order matters in this case.
In this final section you will test your rewards application with Spring and JUnit. You’ll first implement the test setup logic to create a Spring ApplicationContext that bootstraps your application. Then you’ll implement the test logic to exercise and verify application behavior.
Start by creating a new JUnit Test Case called RewardNetworkTests in the rewards package inside the src/test/java source folder.
setUp to
automatically create a setup method, you will need this on the next
step.Once you have your RewardNetworkTests class created, move on to
the next step!
In this step you’ll implement the setup logic needed to run your system test. You’ll first create a Spring ApplicationContext that bootstraps your application, then lookup the bean you’ll use to invoke the application.
First, notice that you have a public void
setUp() method annotated with @org.junit.jupiter.api.BeforeEach - this was
done for you when you selected the setUp() checkbox in JUnit test
case wizard. @BeforeEach is the JUnit
5 equivalent of JUnit 4’s @Before.
Within setUp() call SpringApplication.run, providing it the
TestInfrastructureConfig.class that
you want to load. Doing this will bootstrap your application by
having Spring create, configure, and assemble all beans defined in
the two configuration files (since one imports the other).
Next, ask the context to get the rewardNetwork bean for you, which represents
the entry-point into the rewards application. Assign the bean to a
private field of type RewardNetwork
you can reference from your test methods.
|
Tip |
|---|---|
|
Be sure to assign the reference to the |
Don’t ask the context for beans "internal" to the application. The RewardNetwork is the application’s entry-point, setting the boundary for the application defined by an easy-to-use public interface. Asking the context for an internal bean such as a repository or data source is questionable.
Now verify that Spring can successfully create your application
on test setup. To do this, modify the test() method:
testRewardForDiningfail() - leave
the method body blank for now.Then, run your test class by selecting it and accessing Run >> Run As >> JUnit
Test from the menu bar (you may also do this by
right-clicking in the code window and using the Run As option in the popup menu).
After your test runs, you should see the green bar indicating setUp() ran without throwing any
exceptions.
If you see red, inspect the failure trace in the JUnit view to see what went wrong in the setup logic. Carefully inspect the stack trace - Spring error messages are usually very detailed in describing what went wrong. The most useful information is usually at the bottom of the stack trace, so you my need to scroll down to see it.
Once you have the green bar, move on to the last step!
Now the test setup logic works we can modify our test to invoke
the RewardNetwork.rewardAccountFor(Dining)
method and verify that all the pieces of your application work
together to carry out a successful reward operation.
You will not have to write the Unit Test yourself. Have a look
at RewardNetworkImplTest.testRewardForDining().
You can just copy and paste its content into RewardNetworkTests.testRewardForDining().
|
Tip |
|---|---|
|
In a real life application you would not have the same content for both tests. We are making things fast here so you can focus on Spring configuration rather than spending time on writing the test itself. |
You can now rerun your test. In STS, you may simply select the
green play button on the tool bar to Run
Last Launched (CTRL+F11 or
COMMAND+F11 on MacOS). A green play
button can also be found in the JUnit view tab.
When you have the green bar, congratulations! You’ve completed this lab.
You have just used Spring to configure the components of a realistic Java application and have exercised application behavior successfully in a test environment inside your IDE.